0. 阅读收获 (takeaway)
本文旨在彻底搞懂 RoPE(Rotary Position Embedding)位置编码,阅读完本文你将获得:
- 理解 RoPE 的核心思想:为什么用"旋转"来编码位置信息
- 掌握 RoPE 的数学原理:从旋转矩阵到三角函数证明
- 从零手写 RoPE 实现:逐行代码讲解,可直接运行
- bonus:可视化理解 RoPE:通过热力图和动画直观感受旋转编码
本文代码运行于: Featurize 蒜粒方块 GPU 算力平台,有 GPU 使用需求的同学希望能使用我的邀请链接注册
待更新:不喜欢看文字的同学可以看 B站视频-chaofa用代码打点酱油, YouTube-chaofa用代码打点酱油,或视频号:chaofa用代码打点酱油
1. 为什么需要位置编码?
在 Transformer 架构中,Self-Attention 机制本身是位置无关的。公式如下:
softmax 中 QK 的乘积就是重要性权重,什么意思呢?
# 假设我们有两个句子
sentence1 = "朝发 写 代码"
sentence2 = "代码 写 朝发"

# 对于纯 Self-Attention 来说,这两个句子的表示是一样的!
# 从公式看 Attention 只关心 token 之间的权重关系,不关心它们的顺序
这显然是不对的。语言是有顺序的,顺序不同意思完全不同。因此,我们需要位置编码(Position Encoding, PE)来告诉模型每个 token 在序列中的位置。
1.1 绝对位置编码 vs 相对位置编码
用一个例子来理解这两种编码方式的区别:
句子: "朝发 写 代码"
位置:   0  1  2
绝对位置编码:给每个位置一个固定编号
"朝发" → 位置 0 → PE_0
"写"   → 位置 1 → PE_1
"代码" → 位置 2 → PE_2
备注:PE_0 表示第一个位置的 embedding
相对位置编码:关注两个 token 之间的距离
计算 "朝发" 和 "代码" 的关系时:
→ 不关心它们分别在位置 0 和 2
→ 只关心它们相距 2 个位置
同理:计算 "朝发" 和 "写" 之间的相对位置是 (1 - 0) = 1。
使用相对位置编码就是希望捕获 Token 之间位置的相对关系,保持(某些)语义的不变性,下面 「朝发」和「代码」之间的关系是一样的,尽管绝对位置不同:
句子 A: "朝发 写 代码"
句子 B: "今天 朝发 写 代码"
2. RoPE 的核心思想
RoPE(Rotary Position Embedding,旋转位置编码)的核心思想非常优雅,可以阅读苏神 RoPE blog:
通过旋转变换为向量注入位置信息,使得两个向量的内积只依赖于它们的相对位置。
这句话怎么理解呢?让我们一步步拆解看。
2.1 从 2D 旋转说起
假设我们在二维平面上有一个向量 $(x, y)$,将它旋转角度 $\theta$ 后得到新向量:
这就是经典的 2D 旋转矩阵。下面用一张图来直观理解:
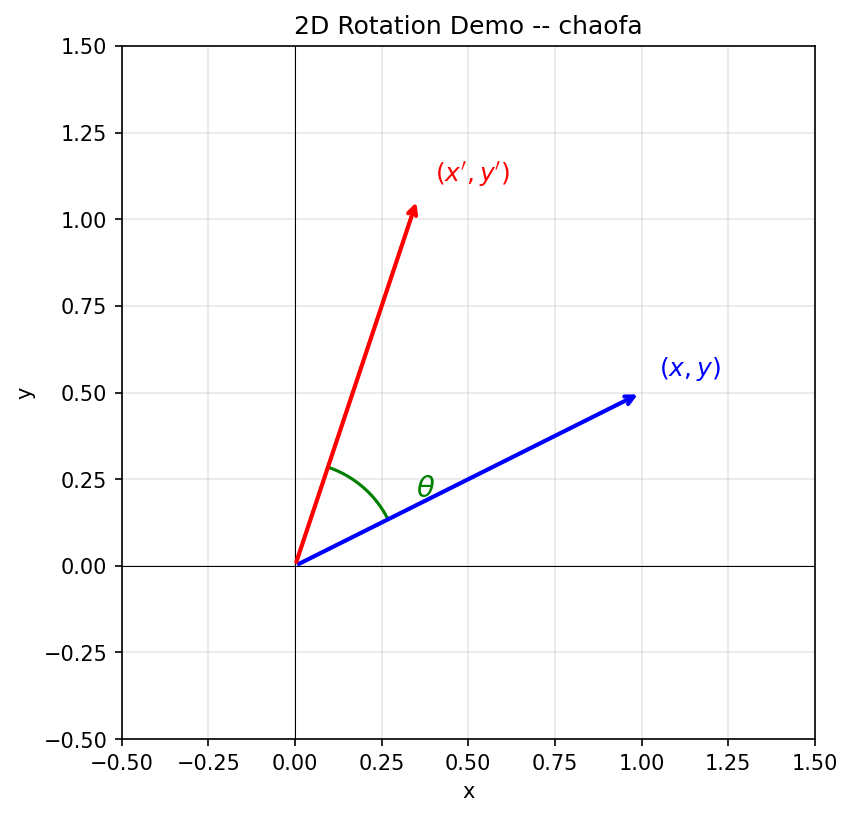
从图中可以看到:蓝色向量 $(x, y)$ 绕原点逆时针旋转角度 $\theta$ 后,变成红色向量 $(x', y')$。
2.2 RoPE 的目标与解决方案
目标:我们希望找到一个位置编码函数 $f$,使得 query 向量 $\mathbf{q}_m$ 和 key 向量 $\mathbf{k}_n$ 的内积只依赖于它们的相对位置 $(m-n)$:
也就是说,无论 $m$ 和 $n$ 的绝对值是多少,只要 $m-n$ 相同,内积结果就相同。
解决方案:RoPE 发现,这个函数 $f$ 就是旋转函数!(实际上是可以通过求解出来的,可以参考:Transformer升级之路:2、博采众长的旋转式位置编码),这里我们假设「知道了这么一个函数」,然后我们去证明它符合我们的需求。
假设词嵌入维度是 2 维($d=2$),对位置 $m$ 的向量 $\mathbf{q}$,应用旋转角度 $m\theta$:
同理,对位置 $n$ 的向量 $\mathbf{k}$,应用旋转角度 $n\theta$:
这就是为什么叫做旋转位置编码:位置信息通过旋转变换注入到向量中。
2.3 证明:旋转函数满足相对位置条件
现在我们来证明,旋转函数确实能让内积只依赖于相对位置 $(m-n)$。
备注:推导有点复杂,其实看前后即可。
证毕:我们把中间这个只依赖于 $(m-n)$ 的旋转矩阵记为 $R_{m-n}$,最终结果 $\mathbf{q}^T \cdot R_{m-n} \cdot \mathbf{k}$ 与 $m$ 和 $n$ 的绝对值无关,只与相对位置 $(m-n)$ 有关。
3. RoPE 的数学原理
现在让我们严格推导 RoPE 的数学形式。
3.1 频率设计
RoPE 对于维度 $d$ 的向量,两两配对处理。对于第 $i$ 对(共 $d/2$ 对),使用频率:
这个频率设计非常关键:
- 低维度(小 $i$):频率高,变化快,捕捉短距离依赖
- 高维度(大 $i$):频率低,变化慢,捕捉长距离依赖
3.2 旋转矩阵的完整形式
对于位置 $m$,向量 $\mathbf{x} = [x_0, x_1, x_2, x_3, ..., x_{d-1}]$,RoPE 的旋转操作可以写成:
每两个维度组成一对,用对应的角度进行旋转。
3.3 在 Attention 中的应用
在 Self-Attention 中,RoPE 应用于 Query 和 Key:
其中 $Q_{\text{rope}} = \text{RoPE}(Q, m)$,$K_{\text{rope}} = \text{RoPE}(K, n)$。
由于旋转的特性,$Q_{\text{rope}} \cdot K_{\text{rope}}^T$ 的结果只依赖于相对位置 $m - n$。
4. 从零手写 RoPE 实现
现在让我们一步步实现 RoPE。
4.1 Step 1: 生成旋转频率
import torch
import numpy as np

def get_rotary_frequencies(dim: int, seq_len: int, theta: float = 10000.0):
    """
    生成 RoPE 的旋转频率

    Args:
        dim: 嵌入维度(必须是偶数)
        seq_len: 序列长度
        theta: 基础频率参数

    Returns:
        freqs: shape (seq_len, dim // 2),每个位置每个维度对的频率
    """
    # 计算每个维度对的基础频率
    # theta_i = 10000^(-2i/d),i = 0, 1, ..., d/2-1
    i = torch.arange(0, dim // 2, dtype=torch.float32)
    freqs = theta ** (-2 * i / dim)  # shape: (dim // 2,)

    # 生成位置索引
    positions = torch.arange(seq_len, dtype=torch.float32)  # shape: (seq_len,)

    # 计算每个位置的角度:position * frequency
    # 外积得到 (seq_len, dim // 2) 的矩阵
    angles = torch.outer(positions, freqs)  # shape: (seq_len, dim // 2)

    return angles


# 测试
dim = 64
seq_len = 128
angles = get_rotary_frequencies(dim, seq_len)
print(f"Angles shape: {angles.shape}")  # (128, 32)
print(f"Angles[0]: {angles[0][:5]}")    # 位置 0 的前 5 个维度对的角度
print(f"Angles[1]: {angles[1][:5]}")    # 位置 1 的前 5 个维度对的角度
4.2 Step 2: 构建 sin/cos 缓存
def get_rotary_embedding(dim: int, seq_len: int, theta: float = 10000.0):
    """
    预计算 RoPE 的 sin 和 cos 值

    Returns:
        cos: shape (seq_len, dim)
        sin: shape (seq_len, dim)
    """
    angles = get_rotary_frequencies(dim, seq_len, theta)

    # 计算 cos 和 sin
    cos = torch.cos(angles)
    sin = torch.sin(angles)

    # 将 (seq_len, dim//2) 扩展为 (seq_len, dim),与 rotate_half 配合使用
    cos = torch.cat([cos, cos], dim=-1)
    sin = torch.cat([sin, sin], dim=-1)

    return cos, sin


# 测试
cos, sin = get_rotary_embedding(dim=64, seq_len=128)
print(f"Cos shape: {cos.shape}")  # (128, 64)
print(f"Sin shape: {sin.shape}")  # (128, 64)
4.3 Step 3: 应用旋转变换
这是 RoPE 的核心,参考 LLaMA 的实现方式:
def rotate_half(x):
    """
    将向量的前半部分和后半部分交换,并对后半部分取负
    [x1, x2, x3, x4] -> [-x3, -x4, x1, x2]

    这是实现旋转的关键辅助函数
    """
    x1 = x[..., : x.shape[-1] // 2]
    x2 = x[..., x.shape[-1] // 2 :]
    return torch.cat((-x2, x1), dim=-1)


def apply_rotary_pos_emb(q, k, cos, sin):
    """
    应用 RoPE 旋转变换(LLaMA 风格实现)

    Args:
        q: Query,shape (batch, seq_len, num_heads, head_dim)
        k: Key,shape (batch, seq_len, num_heads, head_dim)
        cos: shape (seq_len, head_dim)
        sin: shape (seq_len, head_dim)

    Returns:
        q_rot, k_rot: 旋转后的 Query 和 Key

    旋转公式:
        q' = q * cos + rotate_half(q) * sin
        k' = k * cos + rotate_half(k) * sin
    """
    # 调整 cos/sin 形状以便广播: (seq_len, head_dim) -> (1, seq_len, 1, head_dim)
    cos = cos.unsqueeze(0).unsqueeze(2)
    sin = sin.unsqueeze(0).unsqueeze(2)

    # 应用旋转
    q_embed = (q * cos) + (rotate_half(q) * sin)
    k_embed = (k * cos) + (rotate_half(k) * sin)

    return q_embed, k_embed
为什么这个公式是对的?
回顾 2D 旋转公式:
对于向量 $[x, y]$,rotate_half 会把它变成 $[-y, x]$,所以:
原向量 * cos + rotate_half(原向量) * sin
= [x, y] * cos + [-y, x] * sin
= [x*cos - y*sin, y*cos + x*sin]
这正是旋转公式!
4.4 Step 4: 完整的 RoPE 模块
class RotaryPositionEmbedding(torch.nn.Module):
    """
    完整的 RoPE 实现
    """
    def __init__(self, dim: int, max_seq_len: int = 4096, theta: float = 10000.0):
        """
        Args:
            dim: 每个注意力头的维度
            max_seq_len: 最大序列长度
            theta: 基础频率参数
        """
        super().__init__()
        self.dim = dim
        self.max_seq_len = max_seq_len
        self.theta = theta

        # 预计算并缓存 sin/cos 值
        cos, sin = get_rotary_embedding(dim, max_seq_len, theta)
        self.register_buffer('cos_cached', cos)
        self.register_buffer('sin_cached', sin)

    def forward(self, q: torch.Tensor, k: torch.Tensor, positions: torch.Tensor = None):
        """
        对 Query 和 Key 应用 RoPE

        Args:
            q: Query,shape (batch, seq_len, num_heads, head_dim)
            k: Key,shape (batch, seq_len, num_heads, head_dim)
            positions: 位置索引,默认为 [0, 1, 2, ..., seq_len-1]

        Returns:
            q_rot, k_rot: 旋转后的 Query 和 Key
        """
        seq_len = q.shape[1]

        # 获取当前序列长度的 cos/sin
        cos = self.cos_cached[:seq_len]
        sin = self.sin_cached[:seq_len]

        # 应用旋转
        q_rot, k_rot = apply_rotary_pos_emb(q, k, cos, sin)

        return q_rot, k_rot


# 测试
rope = RotaryPositionEmbedding(dim=64, max_seq_len=4096)

# 模拟输入
batch_size = 2
seq_len = 128
num_heads = 8
head_dim = 64

q = torch.randn(batch_size, seq_len, num_heads, head_dim)
k = torch.randn(batch_size, seq_len, num_heads, head_dim)

q_rot, k_rot = rope(q, k)
print(f"Q_rot shape: {q_rot.shape}")
print(f"K_rot shape: {k_rot.shape}")
4.5 验证:相对位置不变性
RoPE 最重要的性质是:两个位置的 Query 和 Key 的内积只依赖于它们的相对位置。让我们验证一下:
def verify_relative_position_invariance():
    """
    验证 RoPE 的相对位置不变性
    """
    dim = 64
    max_seq_len = 100

    # 预计算 cos/sin
    cos, sin = get_rotary_embedding(dim, max_seq_len)

    # 创建两个相同的向量
    torch.manual_seed(42)
    q = torch.randn(1, 1, 1, dim)
    k = torch.randn(1, 1, 1, dim)

    # 场景 1:q 在位置 0,k 在位置 5(相对位置 = 5)
    cos1_q, sin1_q = cos[0:1], sin[0:1]
    cos1_k, sin1_k = cos[5:6], sin[5:6]

    q1_rot, _ = apply_rotary_pos_emb(q, q, cos1_q, sin1_q)
    _, k1_rot = apply_rotary_pos_emb(k, k, cos1_k, sin1_k)

    dot_product_1 = (q1_rot * k1_rot).sum()

    # 场景 2:q 在位置 10,k 在位置 15(相对位置仍然是 5)
    cos2_q, sin2_q = cos[10:11], sin[10:11]
    cos2_k, sin2_k = cos[15:16], sin[15:16]

    q2_rot, _ = apply_rotary_pos_emb(q, q, cos2_q, sin2_q)
    _, k2_rot = apply_rotary_pos_emb(k, k, cos2_k, sin2_k)

    dot_product_2 = (q2_rot * k2_rot).sum()

    print(f"位置 (0, 5) 的内积: {dot_product_1.item():.6f}")
    print(f"位置 (10, 15) 的内积: {dot_product_2.item():.6f}")
    print(f"差异: {abs(dot_product_1.item() - dot_product_2.item()):.10f}")
    print("验证通过!" if abs(dot_product_1.item() - dot_product_2.item()) < 1e-5 else "验证失败!")


verify_relative_position_invariance()
5. 为什么 RoPE 位置编码好?
- 相对位置编码:内积只依赖相对位置,天然适合语言建模
- 外推性能好:配合 NTK/YaRN 可以泛化到更长序列
- 计算高效:不增加额外的位置嵌入,只需旋转操作
- 无需额外参数:基于固定的三角函数,不增加可学习参数
- 兼容 KV Cache:缓存的 K 无需重新计算位置编码
6. 可视化理解 RoPE (Bonus)
以下是选看内容(为了帮助理解 RoPE 的内容)
6.1 位置编码热力图
import matplotlib.pyplot as plt
import seaborn as sns

def visualize_rope_heatmap():
    """
    可视化 RoPE 编码的热力图
    """
    dim = 64
    seq_len = 128

    cos, sin = get_rotary_embedding(dim, seq_len)

    fig, axes = plt.subplots(1, 2, figsize=(14, 5))

    # Cos 热力图
    sns.heatmap(cos.numpy()[:64, :], ax=axes[0], cmap='RdBu', center=0)
    axes[0].set_title('RoPE Cos Values')
    axes[0].set_xlabel('Dimension')
    axes[0].set_ylabel('Position')

    # Sin 热力图
    sns.heatmap(sin.numpy()[:64, :], ax=axes[1], cmap='RdBu', center=0)
    axes[1].set_title('RoPE Sin Values')
    axes[1].set_xlabel('Dimension')
    axes[1].set_ylabel('Position')

    plt.tight_layout()
    plt.savefig('rope_heatmap.png', dpi=150)
    plt.show()

    print("观察要点:")
    print("1. 低维度(左侧)变化快 -> 捕捉短距离依赖")
    print("2. 高维度(右侧)变化慢 -> 捕捉长距离依赖")
    print("3. 每个维度都是周期函数,频率不同")


visualize_rope_heatmap()
6.2 2D 旋转动画
import matplotlib.pyplot as plt
import matplotlib.animation as animation
from IPython.display import HTML

def visualize_2d_rotation():
    """
    可视化 2D 空间中的旋转效果
    """
    # 原始向量
    original = np.array([1.0, 0.5])

    # 不同位置的旋转角度
    positions = range(0, 16)
    theta_base = 0.5  # 基础角度

    fig, ax = plt.subplots(figsize=(8, 8))

    colors = plt.cm.viridis(np.linspace(0, 1, len(positions)))

    for pos, color in zip(positions, colors):
        angle = pos * theta_base
        # 旋转矩阵
        cos_a, sin_a = np.cos(angle), np.sin(angle)
        rotated = np.array([
            original[0] * cos_a - original[1] * sin_a,
            original[0] * sin_a + original[1] * cos_a
        ])

        ax.arrow(0, 0, rotated[0], rotated[1],
                head_width=0.05, head_length=0.03,
                fc=color, ec=color, alpha=0.7,
                label=f'pos={pos}' if pos % 4 == 0 else None)

    ax.set_xlim(-1.5, 1.5)
    ax.set_ylim(-1.5, 1.5)
    ax.set_aspect('equal')
    ax.grid(True, alpha=0.3)
    ax.axhline(y=0, color='k', linewidth=0.5)
    ax.axvline(x=0, color='k', linewidth=0.5)
    ax.legend(loc='upper right')
    ax.set_title('RoPE: 不同位置的向量旋转效果\n(同一向量在不同位置被旋转不同角度)')

    plt.savefig('rope_rotation.png', dpi=150)
    plt.show()

    print("观察要点:")
    print("1. 同一向量在不同位置被旋转不同角度")
    print("2. 位置越大,旋转角度越大")
    print("3. 这就是 RoPE 编码位置信息的方式")


visualize_2d_rotation()
6.3 相对位置注意力分数
def visualize_relative_attention():
    """
    可视化 RoPE 对注意力分数的影响
    """
    dim = 64
    seq_len = 32

    # 生成随机 Q 和 K
    torch.manual_seed(42)
    q = torch.randn(1, seq_len, 1, dim)
    k = torch.randn(1, seq_len, 1, dim)

    # 应用 RoPE
    rope = RotaryPositionEmbedding(dim, seq_len)
    q_rot, k_rot = rope(q, k)

    # 计算注意力分数
    # 无 RoPE
    attn_no_rope = torch.matmul(q.squeeze(), k.squeeze().transpose(-2, -1)) / np.sqrt(dim)

    # 有 RoPE
    attn_with_rope = torch.matmul(q_rot.squeeze(), k_rot.squeeze().transpose(-2, -1)) / np.sqrt(dim)

    fig, axes = plt.subplots(1, 2, figsize=(14, 5))

    sns.heatmap(attn_no_rope.squeeze().detach().numpy(), ax=axes[0], cmap='viridis')
    axes[0].set_title('Attention Scores (No RoPE)')
    axes[0].set_xlabel('Key Position')
    axes[0].set_ylabel('Query Position')

    sns.heatmap(attn_with_rope.squeeze().detach().numpy(), ax=axes[1], cmap='viridis')
    axes[1].set_title('Attention Scores (With RoPE)')
    axes[1].set_xlabel('Key Position')
    axes[1].set_ylabel('Query Position')

    plt.tight_layout()
    plt.savefig('rope_attention.png', dpi=150)
    plt.show()

    print("观察要点:")
    print("1. 无 RoPE 时,注意力分数与位置无关")
    print("2. 有 RoPE 时,注意力分数体现位置关系")
    print("3. 对角线附近通常有更高的注意力(局部依赖)")


visualize_relative_attention()
6.4. 实际应用:集成到 Transformer
最后,让我们看看如何将 RoPE 集成到完整的 Multi-Head Attention 中:
class MultiHeadAttentionWithRoPE(torch.nn.Module):
    """
    带 RoPE 的多头注意力
    """
    def __init__(self, d_model: int, num_heads: int, max_seq_len: int = 4096):
        super().__init__()
        assert d_model % num_heads == 0

        self.d_model = d_model
        self.num_heads = num_heads
        self.head_dim = d_model // num_heads

        self.q_proj = torch.nn.Linear(d_model, d_model, bias=False)
        self.k_proj = torch.nn.Linear(d_model, d_model, bias=False)
        self.v_proj = torch.nn.Linear(d_model, d_model, bias=False)
        self.o_proj = torch.nn.Linear(d_model, d_model, bias=False)

        # RoPE
        self.rope = RotaryPositionEmbedding(self.head_dim, max_seq_len)

    def forward(self, x: torch.Tensor, mask: torch.Tensor = None):
        """
        Args:
            x: 输入,shape (batch, seq_len, d_model)
            mask: 注意力掩码,shape (seq_len, seq_len)
        """
        batch, seq_len, _ = x.shape

        # 线性投影
        q = self.q_proj(x)
        k = self.k_proj(x)
        v = self.v_proj(x)

        # 重塑为多头形式
        q = q.view(batch, seq_len, self.num_heads, self.head_dim)
        k = k.view(batch, seq_len, self.num_heads, self.head_dim)
        v = v.view(batch, seq_len, self.num_heads, self.head_dim)

        # 应用 RoPE(只对 Q 和 K)
        q, k = self.rope(q, k)

        # 转置用于矩阵乘法:(batch, num_heads, seq_len, head_dim)
        q = q.transpose(1, 2)
        k = k.transpose(1, 2)
        v = v.transpose(1, 2)

        # 计算注意力分数
        scale = self.head_dim ** -0.5
        attn_scores = torch.matmul(q, k.transpose(-2, -1)) * scale

        if mask is not None:
            attn_scores = attn_scores.masked_fill(mask == 0, float('-inf'))

        attn_probs = torch.softmax(attn_scores, dim=-1)

        # 加权求和
        attn_output = torch.matmul(attn_probs, v)

        # 重塑并输出投影
        attn_output = attn_output.transpose(1, 2).contiguous()
        attn_output = attn_output.view(batch, seq_len, self.d_model)
        output = self.o_proj(attn_output)

        return output


# 测试
mha = MultiHeadAttentionWithRoPE(d_model=512, num_heads=8)
x = torch.randn(2, 128, 512)
output = mha(x)
print(f"Input shape: {x.shape}")
print(f"Output shape: {output.shape}")
7. 参考资料
- RoFormer: Enhanced Transformer with Rotary Position Embedding
- LLaMA: Open and Efficient Foundation Language Models
- YaRN: Efficient Context Window Extension of Large Language Models
- Extending Context Window of Large Language Models via Positional Interpolation
- Transformer升级之路:2、博采众长的旋转式位置编码
- 十分钟读懂旋转编码(RoPE)
- 解密旋转位置编码:数学基础、代码实现与绝对编码一体化探索
